
Following this instruction will restore most if not all of your damaged photos to back good conditions, viewable for all platforms and devices.
1.1. Make sure that your ItemCode/SKU are unique for all products.
1.2. Make sure one ItemCode/SKU for one product.
Note: If there are variable products (multiple variations for one product), we will have to use another-completely-separate spreadsheet and import, and it is not the scope of this article. We deal with importing Single Products here only.
Importing Variable Product on Woo-Commerce with WP All Import
1.3. Make sure all your product photos are in jpg or png format for easier management.
1.4. Make sure that your jpg files are named with the ItemCode/SKU.
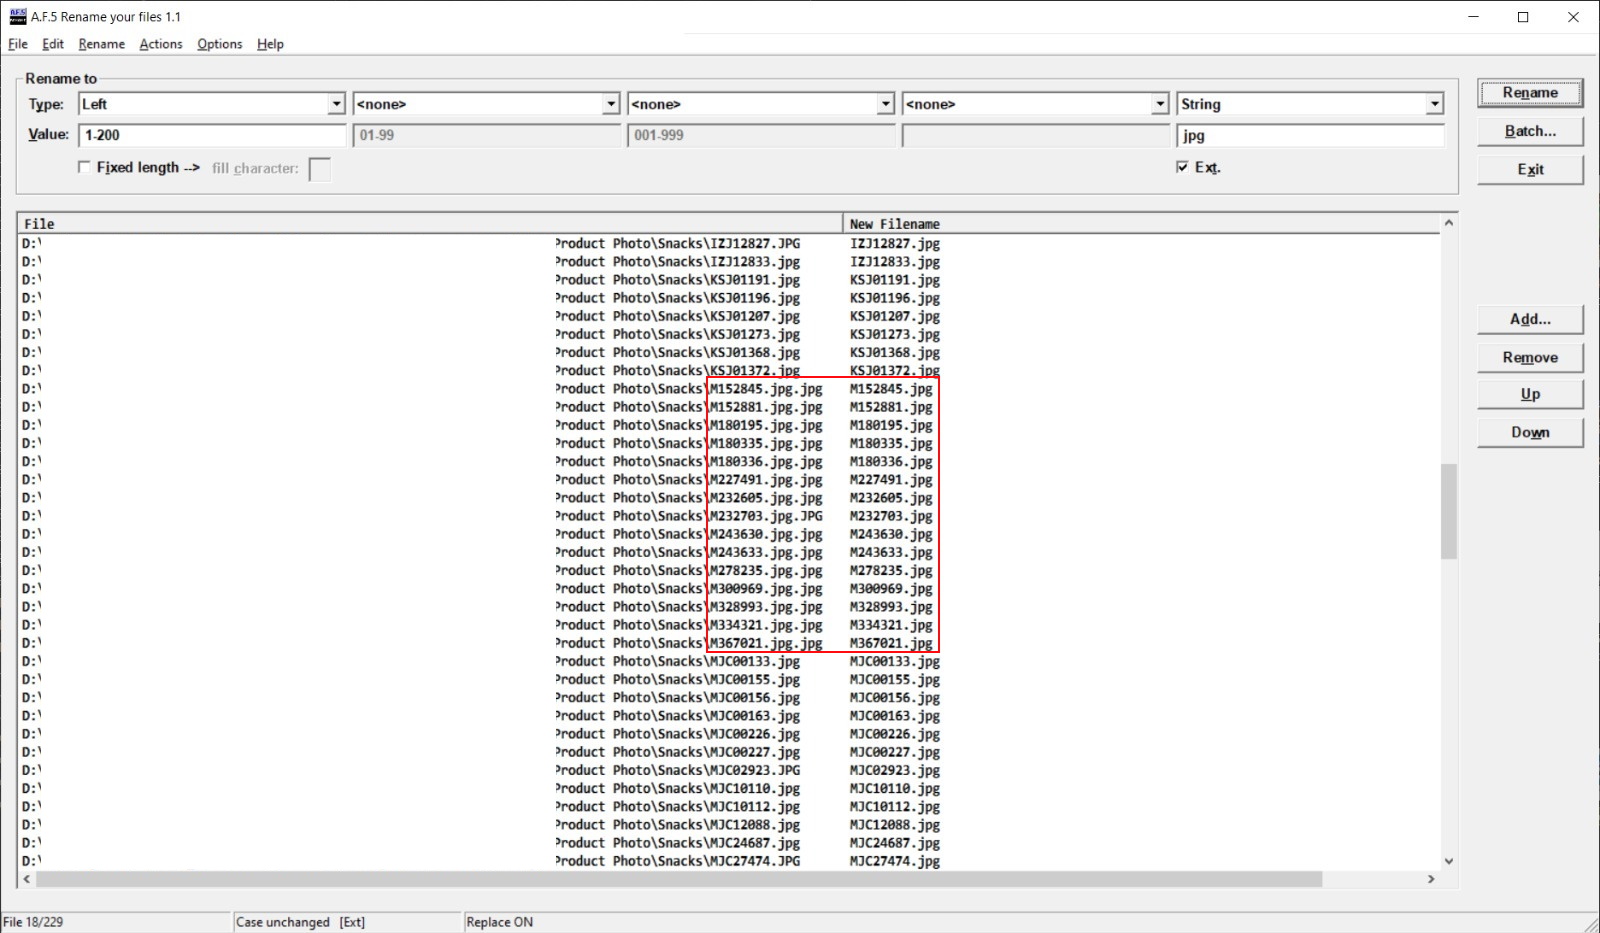
1.5. All the files are renamed with sku (a.k.a. item code) and file extension “.jpg” or “.png”.
1.5.1. Do not use: NA009.jpg.jpg <- .jpg.jpg
Please use A.F.5 Rename your files to rename.
Drag your files to the renamer
Rename > Replace… => replace “.jpg” with “”
Click Rename button on the right column
2. Download and Install “Microsoft SharePoint Designer 2010 (64-bit)”, no license required. It will install “Microsoft Office Picture Manager” as well.
https://www.microsoft.com/en-pk/download/details.aspx?id=24309
3.1. Open “Microsoft Office Picture Manager” from Start Menu.
3.2. On the left, click “Add Picture Shortcut…”, open the folder that contains your photos, and find all the photos that are with the red cross.

4. Open https://converter.11zon.com/en/jpeg-to-jpg/ (The converter)
5. Select all the red cross photos at Picture Manager and drag them into the converter, convert all of them, and download the pictures one by one. Do not download the zip.
6. For the downloaded files, open A.F.5. File Renamer, drag all the downloaded files to the renamers. Press Ctrl+H to search for “-11zon” and replace with “”. Press Rename button on the renamer.
7. Replace the red crossed files with the renamed files. Double check with the Picture Manager by Pressing F5.
8. Now need to fix the product images aspect ratio to 1:1, by padding white space into the images.
8.1. 1:1 aspect ratio means to have the photo’s height and width the same. Even better if all product photos are in the same size. For example: 500px * 500px, or 800px * 800px. If aspect ratio is not 1:1. Without padding your product photos, your shop page will have this,
Length not match in the product grid:
Or this, (all cropped up).

8.2. Download Fotosizer (Windows Only) and use the standard edition is suffice.
Download Fotosizer Standard Edition (FREE)
https://www.fotosizer.com/Download
Use these settings as below, and do not modify any effects, rotation, miscellaneous settings. Saving in 1000px * 1000px can make the excessively large photos smaller. Then, the WordPress processing will be easier and the photos are also easier for mobile devices to download.

8.3. You may backup and zip all of your photo folder before resize operation.
8.4. Select and drag all your files from a folder to the Fotosizer, and click start.
Work one photo folder at a time, and replace the original un-padded photos with padded photos for each conversion. Click “Remove All” in order process another batch of unpadded photos.
8.5. Upload your photo folders to the hosting by FTP. You will run the reimport at WordPress again to fix all the photo problems.
9. Done